Static Website Hosting With Azure and Hugo
Changelog / Warnings
This post was written in 2018 and has been made more or less obsolete with the introduction of Azure Static Web Apps combined with GitHub Actions. This post is kept for historic purposes and unless you experience issues with limitations in Static Web Apps you should probably look into using that instead of following the instructions detailed hereEarlier this summer Microsoft announced Static Website Hosting for Azure Storage in public preview. An affordable way of hosting websites where you don’t need any server side logic. Instead of paying for, securing and updating my own Virtual Machine I decided to check it out. This of course led me deep down a rabbit hole thinking about resurrection my personal website in some way.
Instead of doing this the boring way and just upload some good, old fashioned, HTML I thought why not #RubDevOpsOnIt and use a build pipeline in Visual Studio Team Services and a static site generator to create something cool?
Emerging from this rabbit hole a month or so later is this article (and this website).
Prerequisites
- A Microsoft Azure account
- A Visual Studio Account
- Hugo installed on your machine
- A GPv2 storage account with “Static Website (preview)” enabled
- An empty project in VSTS for your website.
Create a new site with Hugo
Start off with creating a new Hugo site locally. https://gohugo.io/getting-started/quick-start/ has a quick and easy to follow tutorial on how you can do this. Note that Hugo itself does not ship with a default theme so you can either go along with Ananke as described in the tutorial, or you can choose a different theme from https://themes.gohugo.io/ if you like. Also remember to either add some of your own content, or if you just want to try this out, use the “exampleSite” included in the theme.
Before you commit everything and push your Hugo project to VSTS you need to get the “Primary endpoint”-url for your storage account. Log in to Azure, find your storage account and go to “Static website (preview)” in the menu

Also note the two other fields and ensure “Index document name” is set to “index.html” and “Error document path” is set to “404.html”. When all is done. You’ve added some content to your website and verified that it looks sort of ok by running hugo locally (hint: Running “hugo server” in your project directory will let you view your project on http://localhost:1313) our last task will be to commit everything and push your changes to VSTS:
1git init
2git add -A
3git commit -am 'init'
4git remote add origin <the url for your VSTS project>
5git push origin --all
Create a build pipeline in VSTS
Note: After writing this post the build pipeline interface in Azure DevOps has changed. It now defaults to using yaml. You can revert to the old interface by clicking on your user icon on the top right of the page and selecting “preview features”
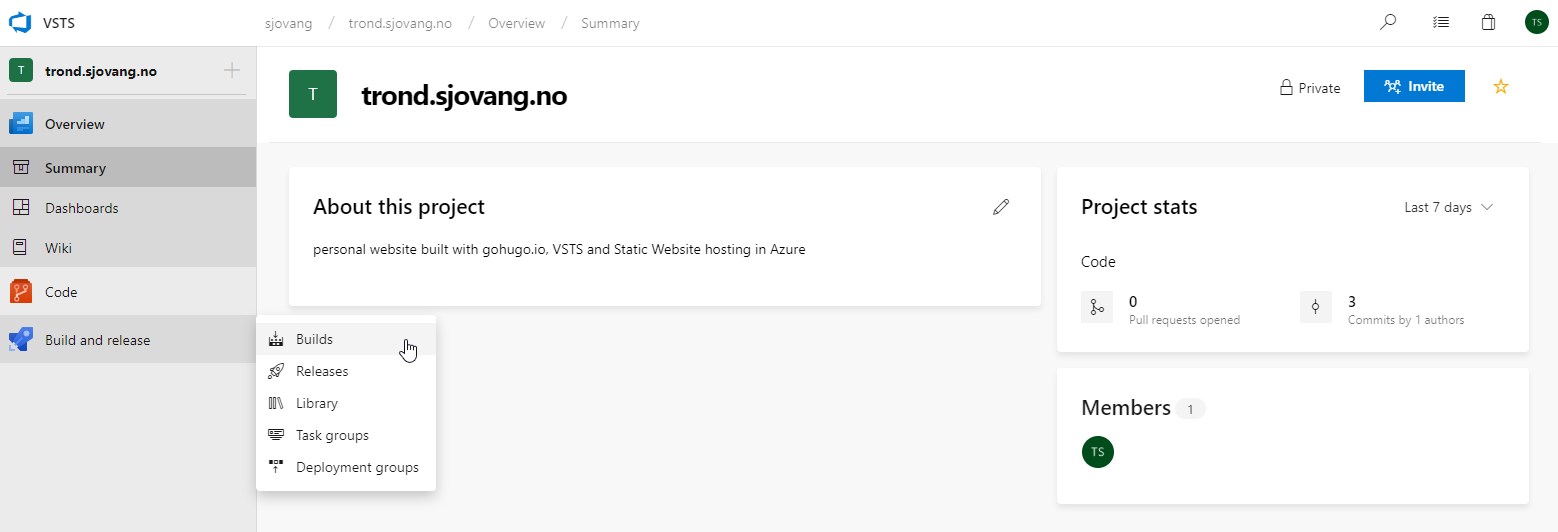
Nest up, log in to Visual Studio Team Services and navigate to the project you created earlier. I have named my project “trond.sjovang.no”, the same as the URL for the website I’m building. Verify that you have “Build and Release” available from the menu on the left and select it to start building a new pipeline. If you do not have “build and release”, select “Project Settings” in the bottom left corner, go to “services” and enable the feature.
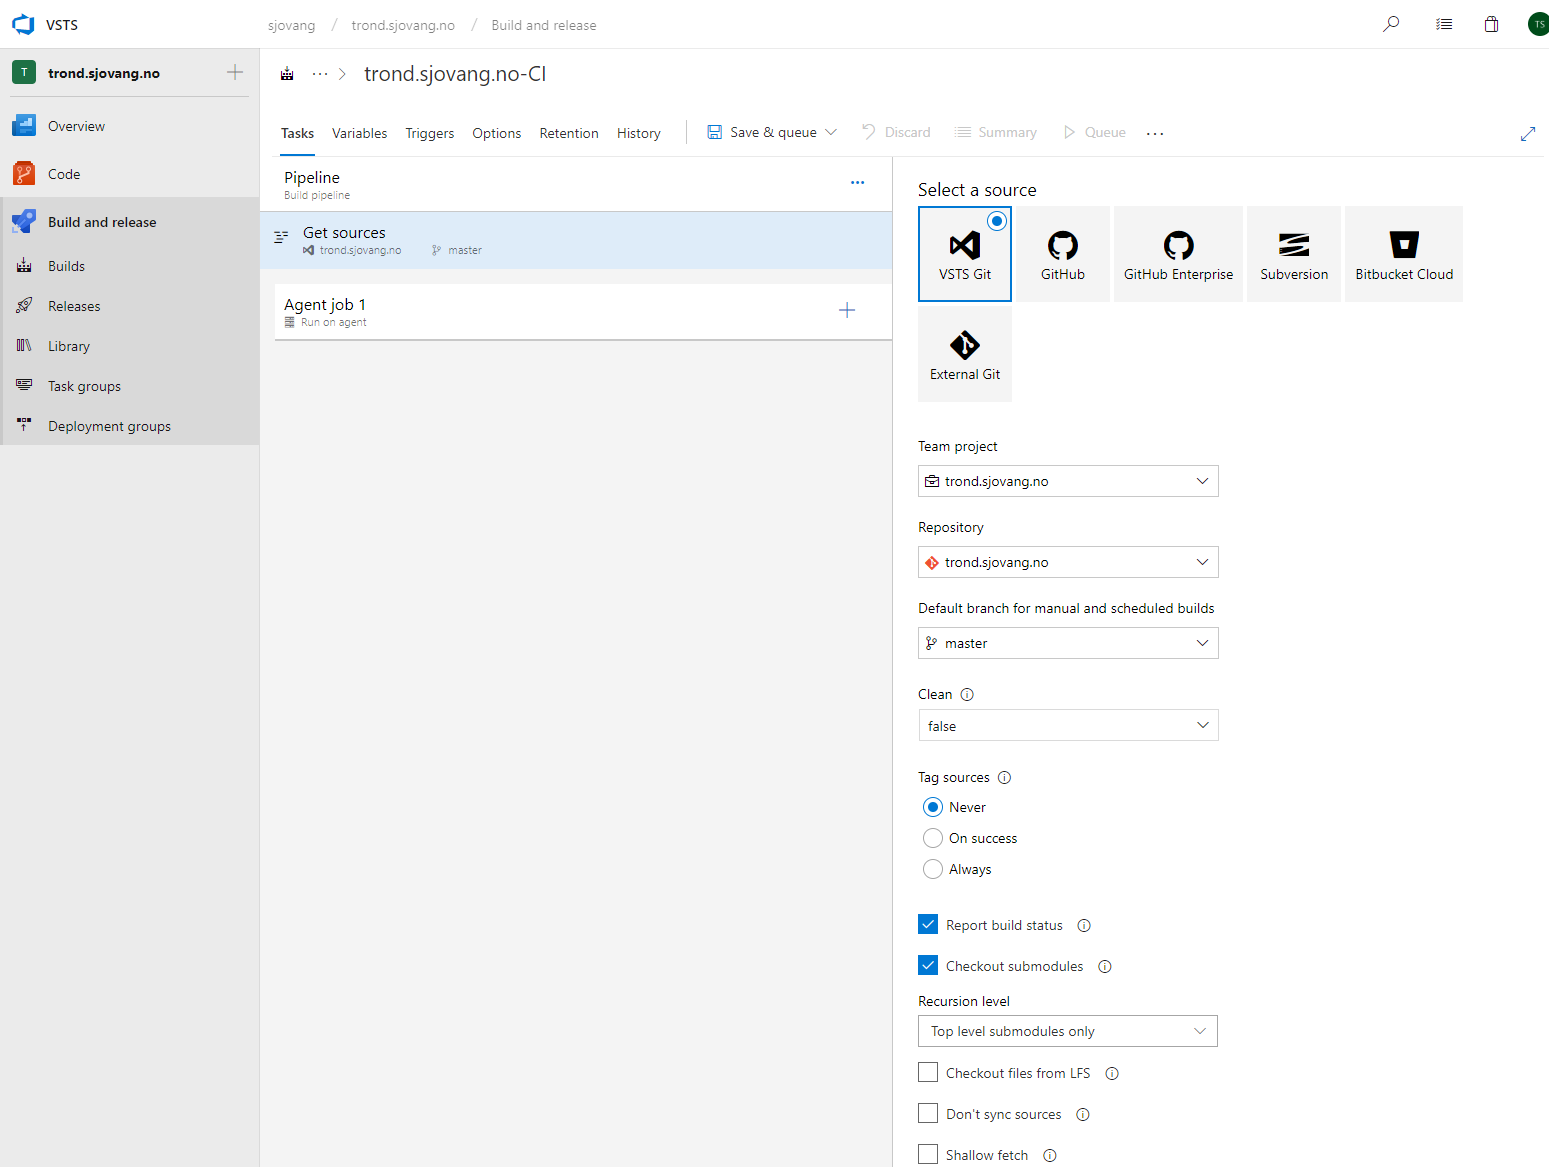
Keep “VSTS Git” selected under “Select Source” and leave the rest of the settings as default. After selecting “continue”, choose “empty job” at the top of the page. You should now have an empty build pipeline resembling the screenshot below. Remember to select “Get sources” and verify that “Checkout submodules” is active if you have your Hugo theme defined as a git submodule.
Next step is to add the Hugo-extension from VisualStudio Marketplace. Select the “+"-sign next to “Agent job 1” and search for Hugo. Select “Get it free” and allow the marketplace-popup to open. If you have access to more than one tenant in VSTS, select the correct one for this project. I have also renamed “Agent job 1” to a more meaningful “Build Website”.

After adding the Marketplace extension, add a Hugo-task to the build pipeline and add “$(BuildSoucesDirectory)\public” under Destination

Last step needed in the build pipeline is to copy the generated output from Hugo to Azure. Add another task to “Agent job 1 / Build Website” and search for “Azure File Copy”.

This task requires some more configuration to work. First verify that Version is “2.* (preview)” and enter “$(Build.SourcesDirectory)\public” under Source (note that this corresponds with where you configured Hugo to generate static HTML in the previous task).
Next we need to authorize VSTS to gain access to our Azure Subscription if this is not already in place. Click “Authorize” and follow the wizard. If you have access to multiple subscriptions, verify that the one containing your storage account is selected.
Set “Azure Blob” as “Destination Type”, Select the correct storage account under “RM Storage Account” and ensure that “Container Name” is set to “$web”. This is a special container created in your storage account when you enable static web hosting, and a source of frustrations for early adopters of this feature as automation tools and API’s have checks that prohibited the use of non-alphanumeric characters in container names.
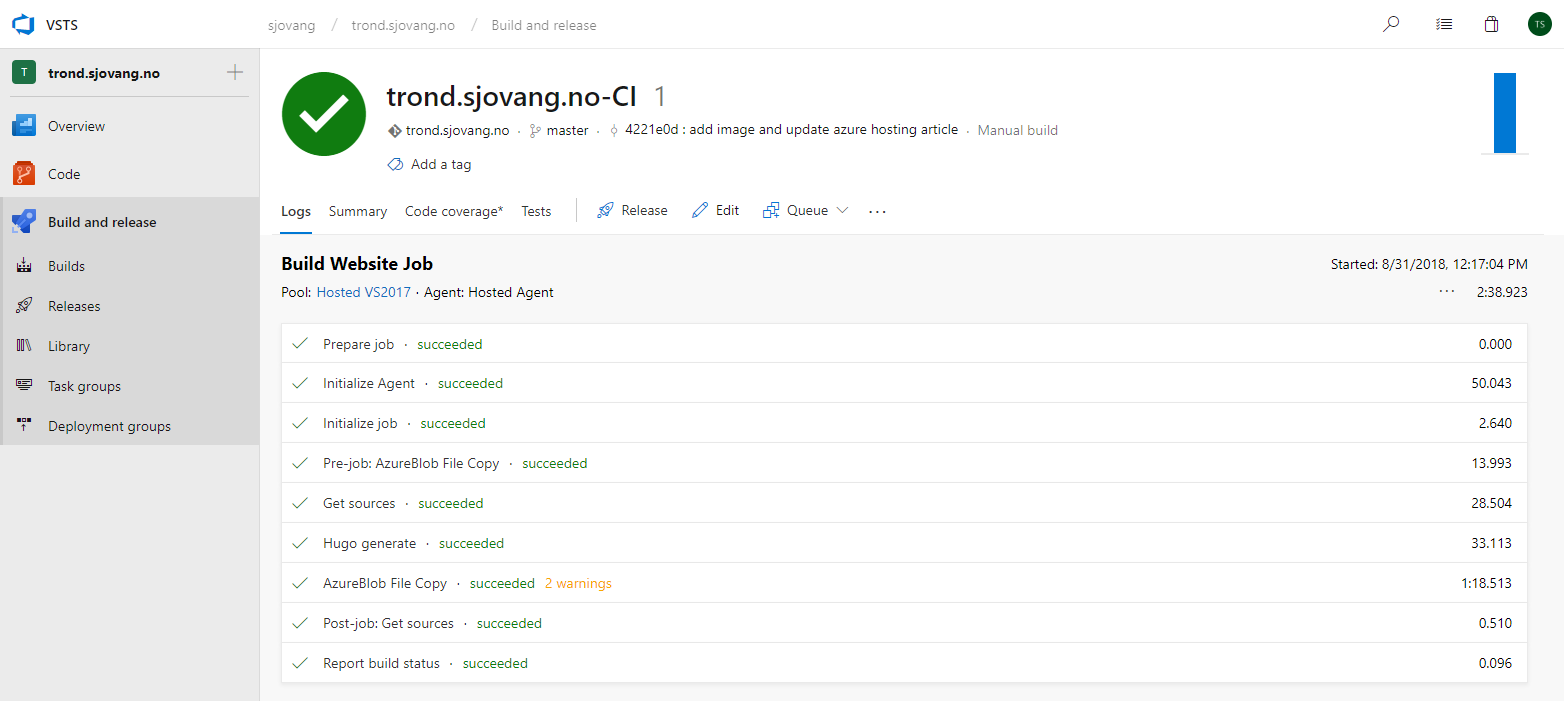
With everything configured, click “Save & Queue” on the top of the page, write a witty comment and kick off your first build! After a quick break for snacks everything should be completed and you could browse the build results
Note: If you would like to use YAML build pipelines instead of clicking through everything in the portal (or just want to verify your configuration by selecting “view yaml”) your configuration should look similar to this
 1queue:
 2  name: Hosted VS2017
 3  demands: azureps
 4
 5steps:
 6- task: giuliovdev.hugo-extension.hugo-build-task.HugoTask@1
 7  displayName: 'Hugo generate'
 8  inputs:
 9    source: '$(Build.SourcesDirectory)'
10    destination: '$(Build.SourcesDirectory)\public'
11    baseURL: 'https://trond.sjovang.no'
12
13- task: AzureFileCopy@2
14  displayName: 'AzureBlob File Copy'
15  inputs:
16    SourcePath: '$(Build.SourcesDirectory)\public\'
17    azureSubscription: 'TSG PAYG (xxx-yyy-zzz)'
18    Destination: AzureBlob
19    storage: tsgstaticwebhosting
20    ContainerName: '$web'
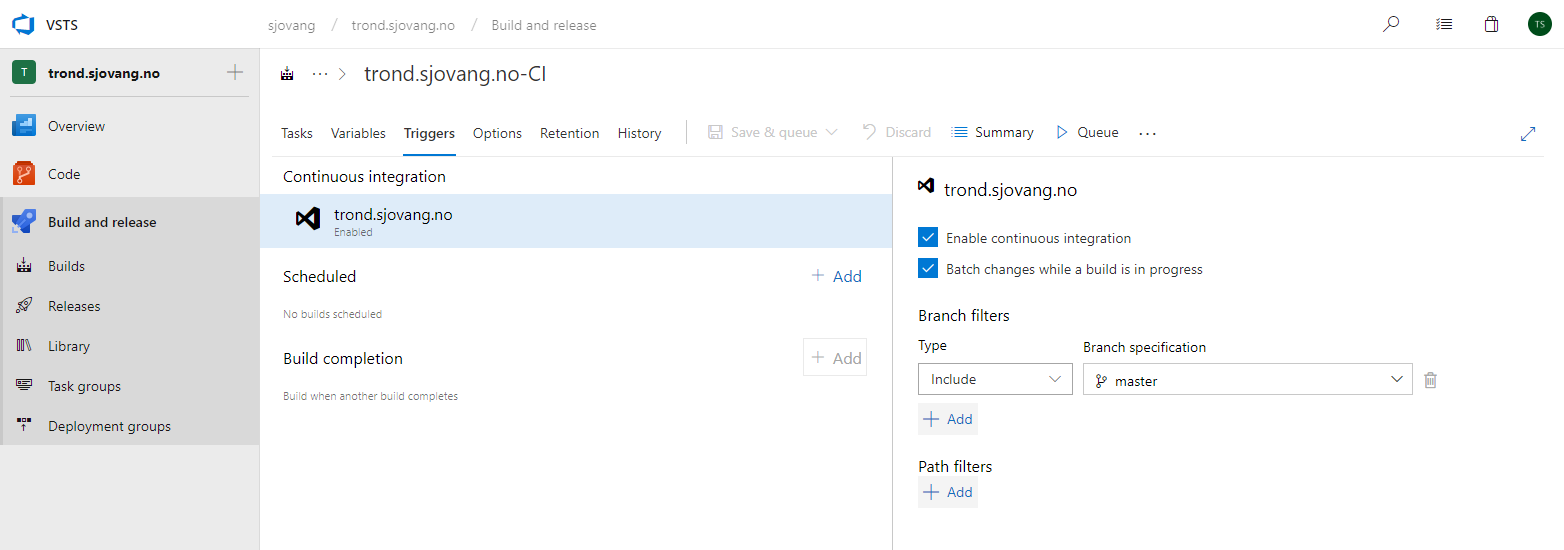
Final step is to #RubDevOpsOnIt and make sure every time we push new things to our website the build pipeline kicks off automagically and updates our website. Edit your build pipeline and go to “triggers”. Check off “Enable continuous integration” and save!
With all this done. Open your Primary Endpoint-URL (you know, the one listed under Static website in your Azure storage account) and look at your wonderful website
Enable https and use your own domain name
Now that we have a website, and an automated build pipeline set up we should enable custom domains instead of using whatever Azure assigned to us. Navigate to the storage account hosting the website and find “Custom domain” from the left hand menu (it’s located under “blob service”) and follow the instructions.
This does not support https, and in 2018 you should really have https enabled. If you don’t, you’re uncool. Microsoft suggest using Azure CDN to accomplish this, but that seems a bit overkill in my head. As I already use Cloudflare as DNS provider for my domain names I just enable https under crypto and I’m good to go. Cloudflare has a free edition that does way more than I need and their pricing isn’t too bad if I want things like a custom certificate or other “pro” features